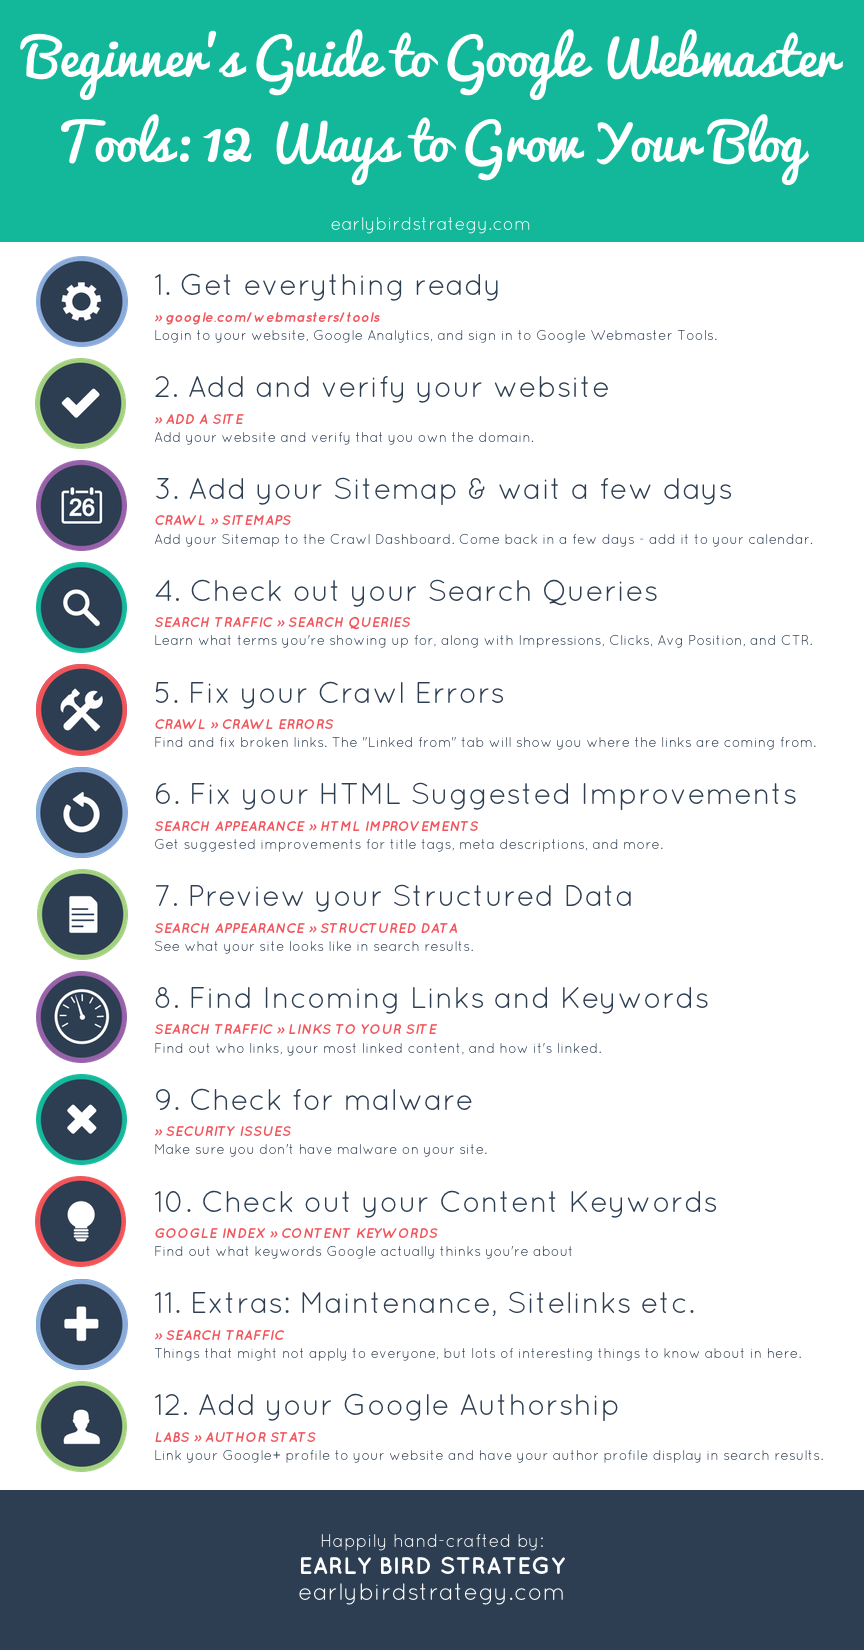
One of the first things you probably think about when you’re setting up a new business is “I need a website!” Another important thing to get nailed down right away is an email address at your new domain name. There are several reasons to have an email address with your domain name in it.

Why? First off, this makes your business look more legitimate. How many times have you visited someone’s Contact page on their website or seen a business card with an email address like: [email protected] or [email protected]? Not too professional looking. Plus, there are some SaaS products that need you to “prove” you own a domain name and that’s one way of validating that you do.
The good news is it’s pretty quick to do and you can still use Gmail, keep your current account and just add this new fanciful email address as a forward. Here’s how. Remember if you’re going to forward your account to a Gmail account to do all of the following steps so that you can both send and receive messages into your regular Gmail account. So here’s a quick tutorial on how to get your email address after you’ve snagged your domain name!
1. Figure out where you’re starting from
Do you still need to buy your domain name? Ok, go do that first. Have a domain name? Ok, keep reading.
Even if you haven’t set up a website or purchased web hosting yet (what!? buying a domain name isn’t all I have to do to have a website? Nope, let’s talk about this more later), you can still set up an email address. So figure out where you bought that domain name: Namecheap? GoDaddy? (not my preferred domain name vendor, but we’ll use it as our example since so many people seem to purchase their domain there when starting out).
2. Find the email settings area
Login to your account where you purchased your domain name, and go to the “My Account” area. From there you’ll see a list of options, one of them being “Email”, click the “Set Up” button. Remember, you don’t need to buy anything additional to set this up. We’re simply forwarding your email address to something more use-able – Gmail.

Note: If you already have web hosting somewhere you’ll usually find this area somewhere in the cPanel of your domain/hosting service.
3. Pick your email address and designate where it should forward
This is where we’ll pick an email address, so whether you go with your name or something like hello@ or info@, just make sure it’s what you want so you don’t have to change it in the future. This is the email you’ll use to set up other services like social media accounts, if you don’t have those as well.
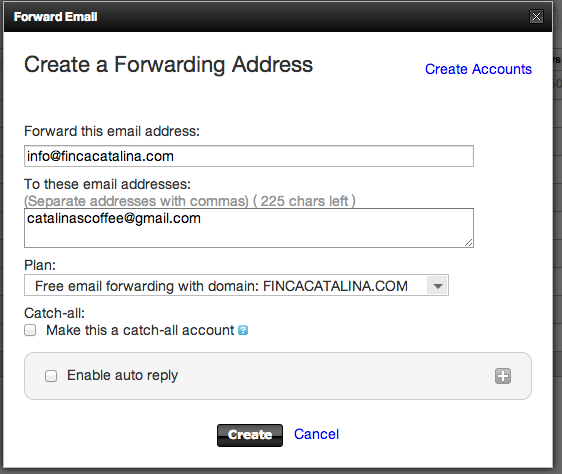
While you can make your account a “catch-all” account, meaning anything that gets sent to a random email address at your domain will get sent to you, but I’d recommend not to do this since you’ll generally receive a lot more spam emails (ie. “Hi Webmaster!”).
If you domain hosting doesn’t allow you to forward email for free, then you’ll probably need to change your MX record too. The easiest way to find the step by step direction for your hosting provider is to search their help section for “MX” or contact them! For example, here’s Namecheap’s help topic.
4. Add this email address to your Gmail account so you can both send and receive emails from this email address
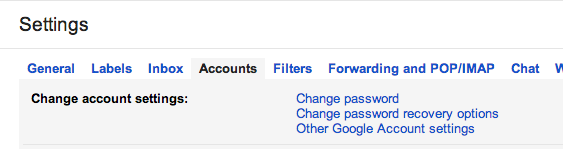
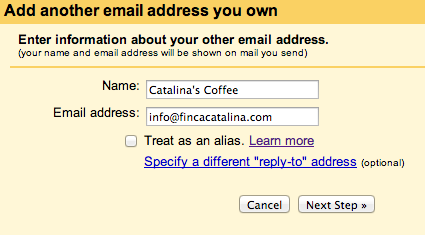
There’s no need to have a million email accounts you’re always logging in and out of in Gmail. Inside Gmail, click the little Gear icon at the top right and then click Settings. Then click on Accounts (4th tab over), and then click the “Add another email address you own” link. On the box that pops up, fill in your name, your new email address, and uncheck the the “Treat as an alias” checkbox. (Essentially, you’re saying “Hey Google, when I send and receive email from this email address remember that is how I also want to reply etc” so it doesn’t say “sent on behalf of …” etc).
On the next step, just keep as “Send through Gmail” and you’re done! It will send you an email to verify that you do indeed have possession of the email address, but since you already set up the forward, you should see that email drop straight into your Gmail account.
Then just make sure you have the button selected below the account info (under “Send mail as” section on Account) that says “When replying to a message: Reply from the same address the message was sent to”. You can also mark this new email address as your “Default” email account.
5. All done! You’re in business!
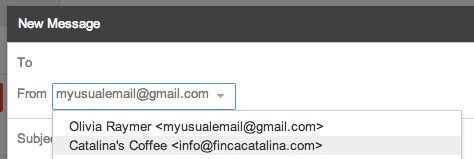
Next time you “Compose” an email message it will show you both email addresses in the From dropdown. Just select which one you want to send from and you’re good to go!
Make sure to send some test emails to/from other email accounts to verify that you can both send and receive emails at your new email address.
Happy emailing! Feel like you’re drowning in email overload? Check out Part I of my Gmail Better series – 5 Things You Should Be Doing in Gmail