
Sometimes as creatives and planners and grand dreamers and schemers we have a habit of getting ahead of ourselves. We plan for scale. We try to think of all the ups and downs ahead. We think what would happen if our post went viral. We try to consider all the ways our project could fail and make sure we have counter-balances and process and and and…
It’s great to be prepared. It’s wonderful to invest time and go for quality. What’s not wonderful is when we spend so much time creating something just to find out that it’s not what our community, our customers, our readers – or even we ourselves – want or care about.
Start today. Iterate tomorrow.

In the web development and startup world there’s a phrase that gets tossed around a lot of “ship it”. I guess you could compare it to the sales world of “Always be closing”. So as a marketer, speaking to small businesses (whether you’re a writer, a solopreneur, or the owner of a small business) – what’s something this week or even today that you’ve been sitting on – planning?
What could you do today to get at least a start of that project live – to get a proof of concept? “Proof of concept” is just a quick way of saying that you’re able to get some kind of evidence (proof) that a potential idea, product, or service (concept) can be successful.
Here are some ideas:
- Talk to past customers or readers
- Talk to prospective or current customers and ask for their feedback on this idea
- Is there a written component? Publish a small part of the idea
- Search for people (on Twitter, forums, blogs) who seem to be looking for something – even a feeling – that your idea provides
- Create a landing page with sign up info
The goal here is not to try to deceive people or create half-assed services and products. The goal is to see if anyone even wants what you’re building before you build it.
Here’s a personal example: I first started creating a shareable version of my Editorial Calendar as a post and free download in December. Of course, I thought I would make time to finish it before I actually did. I planned to launch it before the beginning of January so it would be useful to people planning out their content for 2014.
I wanted to include it as a free download incentive for signing up for my newsletter list. I didn’t end up getting my editorial calendar into a shareable state until January, and was a little bummed that now the calendar was a little outdated. I casually mentioned it over drinks with a few friends who have blogs and they shared that they’ve been meaning to blog on a more scheduled basis for a couple years now, but have a hard time figuring out what to write about every time they actually start digging in.
I decided I should just push the editorial calendar template out there and make changes on the fly. I spent a bit more time tidying the spreadsheets and added a quick “How to use this template” tab and shoved it out there. I used a simple Google form embed in the blog post to collect signups. Then I shared the doc with people who signed up and imported them into Mailchimp for the first few weeks. 100% NOT a scaleable system. That wasn’t the point. The point was to see if it was even something to build a system around in the first place. Turns out it was, and is fully-automated now. However, it didn’t need to be perfect. The sharing process didn’t need to be automated to initially get it out there – to see if people were interested, and found it useful.
Since I like to include a lot of hands-on tutorials around here, I thought I’d share how you can use the same process to quickly test something. You can embed a Google Form on your site, but you don’t have to use the plain “Google embed” code that looks 100% like you slapped a Google Form on your site.
How to Customize the Style of a Google Form – to use on your website:
Here how to embed a Google form on your site without using the ugly “Google embed” code. This works great for both polls or signup boxes right in a blog post. Yay, let’s beautify the Internet! Here’s how:
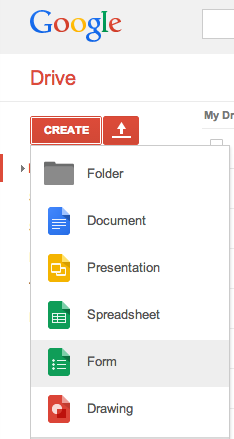
1. Create your Google Form
From your Google Drive account, click Create >> Form. Add all the fields and items that you need in your form.
2. Click “View live form”
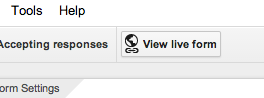
Clicking that button will take you to a page that previews what your form looks like. The url will look something like this: https://docs.google.com/forms/d/234234k3lj4k3j4kl23j43kl/viewform
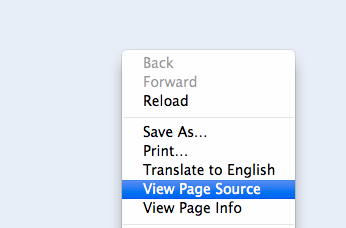
3. Right-click anywhere and select “View Page Source”
4. Copy everything between <form> and </form>
Make sure to including the <form> part. Paste this into a text editor so if you want to revert to it in the next step you don’t have to revisit the source code again.
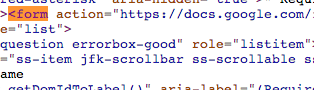
It will look something like this:
<form action=”https://docs.google.com/forms/d/3Lmillionsoflettersandnumbers/formResponse” method=”POST” id=”ss-form” target=”_self” onsubmit=””><div role=”list”> <div role=”listitem”> <div dir=”ltr”><div><label for=”entry_LOTSONUMBERS”><div>Name </div> <div dir=”ltr”></div></label> <input type=”text” name=”entry.NUMBERSSOMANY” value=”” id=”entry_MORENUMBERS” dir=”auto” aria-label=”Name ” aria-required=”true” required=”” title=””> <div></div> </div></div></div> <div role=”listitem”> <div dir=”ltr”><div><label for=”entry_NUMBERSAGAIN”><div>Email </div> <div dir=”ltr”></div></label> <input type=”email” name=”entry.NUMBERSAGAIN” value=”” id=”entry_YEPMORENUMBERS” dir=”auto” aria-label=”Email @” aria-required=”true” required=”” title=”@”> <div>@</div> </div></div></div> <input type=”hidden” name=”draftResponse” value=”[,,"-SOOOOMANYNUMBERS"] “> <input type=”hidden” name=”pageHistory” value=”0″> <input type=”hidden” name=”fromEmail” value=”false”> <input type=”hidden” name=”asdfasdf” value=”-YEPYEPNUMBERS”> <div><table id=”navigation-table”><tbody><tr><td id=”navigation-buttons” dir=”ltr”> <input type=”submit” name=”submit” value=”Submit” id=”ss-submit”></td> </tr></tbody></table></div></div></form>
5. Customize and Preview
Copy and paste the code into directly into the Text/HTML view of WordPress etc. The form will now use your CSS default styles on your website. You can then Preview and edit the code until you have it looking like you want. If you’re using WordPress, you can toggle back to “Visual” mode and even remove silly things like where it says “Never submit passwords through Google Forms.” Yeah, duh Google.
6. Test!
This is the most important step. Preview and test your form and see if all the data actually made it into your Google Drive form response spreadsheet. After you make the post or page live, test again!
A few more Google Forms Tips for analyzing your results:
- Click Responses >> Summary of Responses to see an at a glance (non-spreadsheet) view, along with a graph of number of daily responses.
- Don’t forget you can sort and filter the data in the “Responses” spreadsheet. I usually copy/paste into a different tab so I can leave the raw data as-is.
- Use ifcount statements to add up the results if you created a poll. Example: =COUNTIF(C2:C200″put whatever text you want it to count here”).
Enjoy!
What can you “ship” this week or today?