One of the first steps to setting up your own website or blog is to determine where it will live on the Internet – formally called hosting or web hosting. This guide is everything you need to know to get started. Want to get right to work? Skip ahead to the recommendations.

Table of Contents:
1. What is Web Hosting?
2. Free Blog Hosting vs Paid
3. The Different Types of Hosting
4. Step-by-step: How to Order & 1-click Install WordPress
What is web hosting?
A web hosting service provider is a company that lets you “rent” storage space and access on their servers for your website.
Buying your domain name is not buying web hosting – you have to do both. If you think about it in real estate terms… your domain name is you purchasing (ahem, renting) the land – “Yay, I’m the only person who can build here now!” And purchasing web hosting is like building the house on that land. So you could also think of the yearly domain name fee as your annual property taxes. :)
Free blog hosting vs paid
There are free options for websites, hosted through blogging platforms like Blogger, WordPress.com, Tumblr etc. While I don’t recommend this for business needs, it is a good way to take blogging – in general – for a test drive.
When I first started blogging back in 2003 I had a Blogger blog, played with MoveableType a few years later, moved to WordPress.com in 2006 and finally ponied up for hosting and migrated to hosted WordPress in 2007. Note: sometimes the whole WordPress thing can be confusing to new bloggers. To clarify WordPress.com is their free blog hosting (which gives your website url as yourradwebsite.wordpress.com etc.) and WordPress.org is where you find the free download/support/documentation of WordPress that needs to be hosted elsewhere (ie. the hosting is not free).
Websites and blogs have come a long way in the last 11 years, so now just starting with your website right off as a domain and hosted is what I recommend 99% of the time. The other 1%? If you have thought about starting a blog and have a track record of flaking out on the follow through. Write out 10 complete blog posts in a text doc or Google Docs before doing anything else. Finished that? Ok, proceed!
Software: WordPress or something else?
While most of your start up needs are cheap or free – your website is one thing that you do need to spend a bit on – even if you found a free theme or aren’t going the route of a professional designer. If you’re really going to give your business a go it’s usually the best choice to get set up with your own domain name and web hosting. This gives you the flexibility to customize things as you want. If you want to have the ultimate flexibility and are using WordPress then you need web hosting to “install” (don’t worry all hosting providers offer “one-click install” now) WordPress on. Once you choose your domain name it’s really just a few minutes to go from no blog to blog!
There are other options for a professional looking website, like Squarespace, but I still recommend the blogging software/content management system of WordPress most often – for it’s flexibility and scalability.
What are the different types of hosting?
As far as this tutorial is concerned, you only need to worry about Shared Hosting, as it’s the best place to start, but we’ll do a brief overview of the others. As you grow, you may need to move your service level up (growth! good problems to have!) Shared hosting is also great if your website will probably always be more of a portfolio or landing page for your consulting services and you don’t plan on having tons of traffic.
There are four main types of hosting:
- Shared Hosting – small potatoes – Most offer very similar services – but some vary widely in how they respond to downtime and problems.
- WordPress Managed Hosting – small to big potatoes – shared and VPS are usually self-managed. Managed hosting can scale, has all the bells and whistles, but is a premium service and price.
- VPS – Virtual Private Server – medium potatoes – You can usually upgrade to a VPS from your current shared-hosting provider
- Dedicated – big potatoes – if you’re reading this guide you 100% don’t need this yet! Examples: Rackspace, Amazon Web Services (AWS).
Shared Hosting:
If you’re just starting out this is what you need. Shared means that there’s a server that you and bunch of other small potatoes are all sharing. If you get too big for your britches later you can always upgrade or move to a different type of hosting.
Things to look for: unlimited add-on domains – you want this for the flexibility to grow later (Example: if you have one blog about your love of all things Kale and another website about traveling in Spain, you can have them both hosted in one account – you don’t need to pay for hosting twice); unlimited databases, storage, emails etc.; support options – like live chat, contact info, responsive-ness to complaints on Twitter, support ticket system, phone #.
All good options: Bluehost, Dreamhost, HostGator, Fat Cow, 1and1, and mediatemple.
WordPress Managed Hosting:
So many people use WordPress now that a few hosting companies have sprung up that specialize in just managed WordPress hosting. If you want usability, service and don’t care about paying more (starting at 2.5x the price of basic hosting) there are specialty hosting options from WP Engine, Page.ly, Zippykid etc. Higher-end options like WP Engine will make sure everything is running smoothly.
Side note: Web App hosting when you’re not just firing up a blog through WordPress uses companies like Heroku, Linode, Google App Engine etc.
Bottom-line:
- If this is your first website and you’re on a budget, I recommend Bluehost.
- If you want the absolute cheapest, go with Fat Cow.
- If you want hassle-free, and can handle the price that goes with that, go with WP Engine.
Step-by-step: How to Order and Install WordPress
The quickest way to get started is to buy your domain name at the same time as your hosting provider. Otherwise, you’ll need to login to where you purchased your domain and point the DNS to where your web hosting is. It’s not a difficult task, but if you already feel like this stuff is complicated enough (you know who you are), do it all in one go!
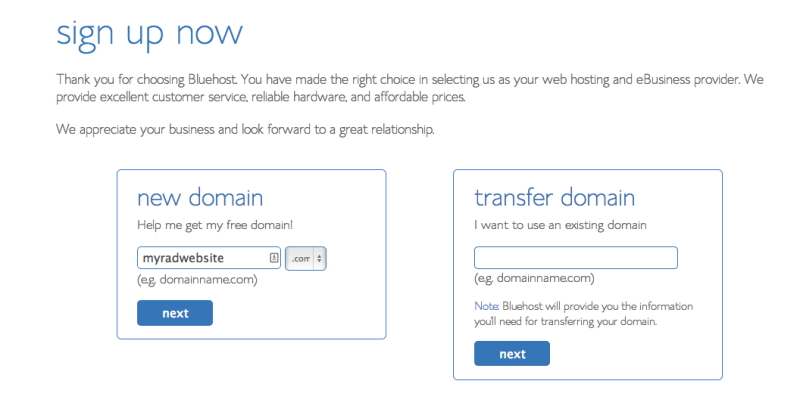
1. Search for a domain name
Go to Bluehost and click the “Get started now” button, which will take you to this screen where you can search for a domain name (if you picked a different hosting provider, the process will be roughly the same):
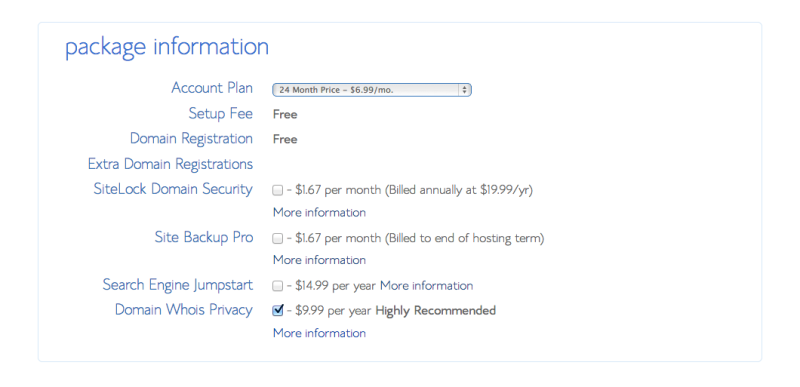
2. Uncheck all the unnecessary upsell boxes
Hosting now includes all kinds of silly upsell options. Don’t be confused. You don’t need sitelock, backup pro, search engine “jumpstart” and all the other junk offered on the order screen. The only thing you’ll want here is Domain Whois privacy, unless you don’t care that your contact info is listed on the public Whois info. Your screen should look like this:
3. One-click WordPress install
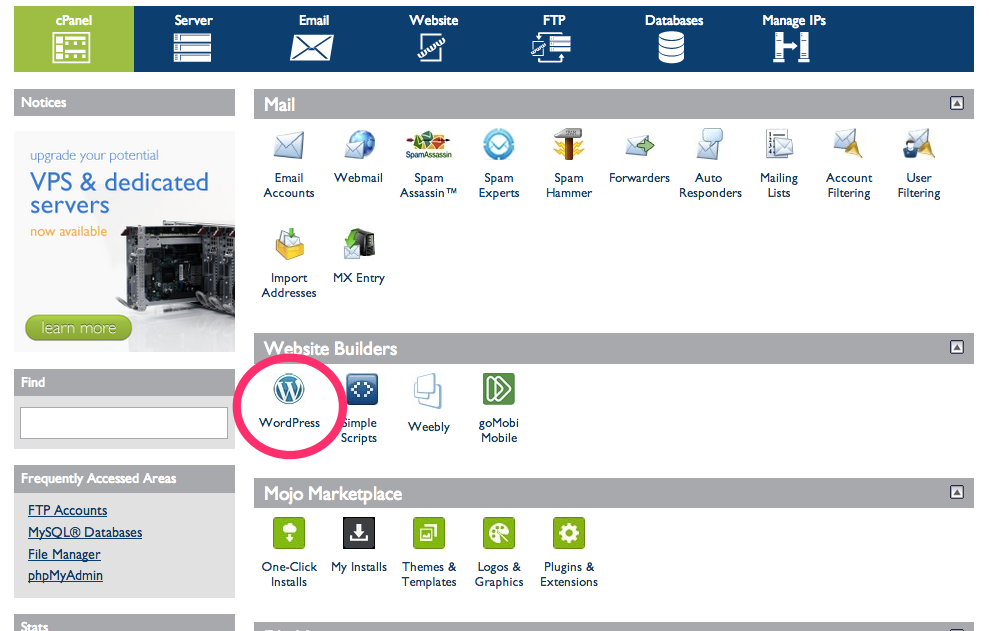
After you’ve entered your payment details and clicked purchase, navigate to your cPanel and click the WordPress icon:
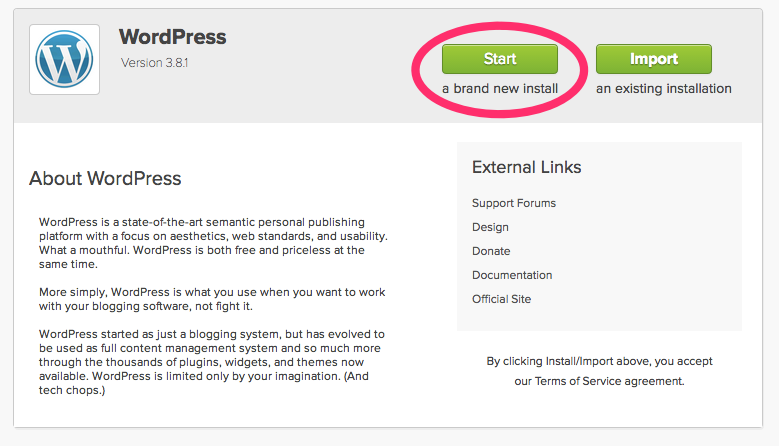
This will take you to the “one-click install” area. If you want to get exacting, it’s actually about 3-clicks, but it’s still way easier than it used to be! Then click the “Start – a brand new install” button:
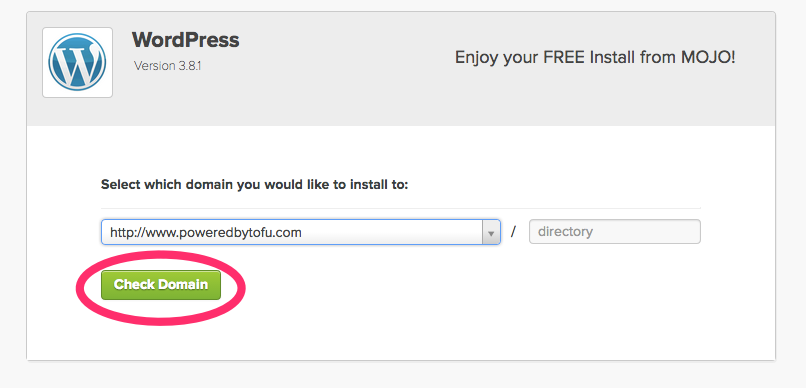
On the next screen you’ll select which domain you want to install WordPress on (if you had several domains you could select a different one from the dropdown). Remember it’s best to keep your WordPress install at the root domain level, so leave the “directory” text box on the left blank, unless you have a really good reason for doing so. Then click the “Check Domain” button:
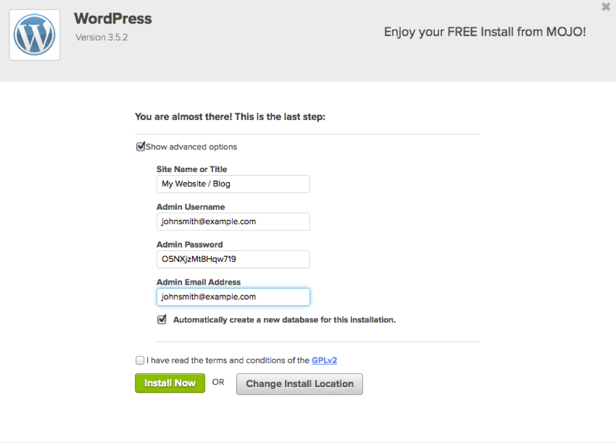
On the next screen check the “show advanced options” box. Enter your Site Name (don’t worry, you can change this later), your admin username (don’t use the username of “admin”), admin password (if you pick something you can remember it’s probably not secure, so write it down, and think about setting up password management on your computer # 1 on this list), your admin email address and make sure the checkbox for “Automatically create a new database for this installation” is checked. Then click the “Install Now” button.
On the next screen it will show a status of “installing”. When it’s finished installing, it will provide you with the admin login url, your username, and password. For future reference, you can always find your admin login at /wp-admin added to the end of your url. Example: yourradwebsite.com/wp-admin.
And that’s it! You have a WordPress website. The next steps are setting up an email address at your domain, selecting a WordPress theme, and customizing your WordPress settings, and plugins.
How’d you do? Questions or tips? Leave them in the comments!