Creating a Facebook page is an easy step to building your online presence, but optimizing it so that you actually get likes and traffic back to your website, is where the fun is.

To learn more about Facebook Pages and how they’re different than your personal Facebook account, check out Facebook’s great intro to Pages tips. Note: Your personal account will tied to the Page, as the “owner”, but only you will see the connection – none of your fans will see your personal details, they’ll only see the business Page.
 Step 1: Create a page – and name it correctly
Be logged in to Facebook with your personal account, and then create a page. All you really need to do to begin is to name your page. You can even ignore the 3 next step boxes (1: About, 2: Profile Picture, 3: Add to Favorites). The most important thing in this step is to name your page correctly (you can change your Page name later, but it isn’t always immediate). So make sure you have your apostrophes and capitalization how you want it. You can also change your Page category later too, so don’t stress about which to pick. Although, if you have a physical location your Facebook page will be set up slightly differently, so make use of that if you do want customers to find your store etc.
Step 2: Choose a username/url
Having a Facebook custom url is nice so that you don’t have a long and obnoxious link going to Facebook (Example: your Facebook share url will be facebook.com/earlybirdstrategy vs facebook.com/pages/earlybird-eq43432423434rer). Go to the username page, and select your Page (that you just created above) from the dropdown list. Try to pick a url that is short but close to the name of your business. If your exact business name (in username form) is taken, just pick something similar enough. Example, /earlybird was taken, but earlybirdstrategy works (as would earlybirdblog, earlybirdmedia etc). Occasionally the Facebook settings say you need 25 fans to complete this step, but not always, so give it a try now. Remember, you can change your username 1x, so choose or change wisely.
Step 3: Add a short About section including your website url
Go to your Page that you just created. One of the most under-utilized pieces of real estate on Facebook Pages is adding your website url under your profile picture. Remember, if you don’t add your website url here, your customers are one click further away from even finding your website (which is our “hub” of everything we do!). We want our customers and fans to see our website link front and center (well front left if we’re being technical) when they visit our Facebook page!
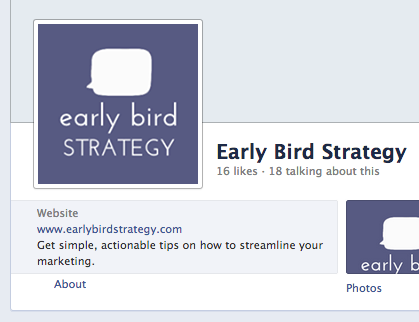
Click on the “Update Page Info” button on the right side of your Page. This will take you to your Page Info/Settings area, where we can add more info about your company.
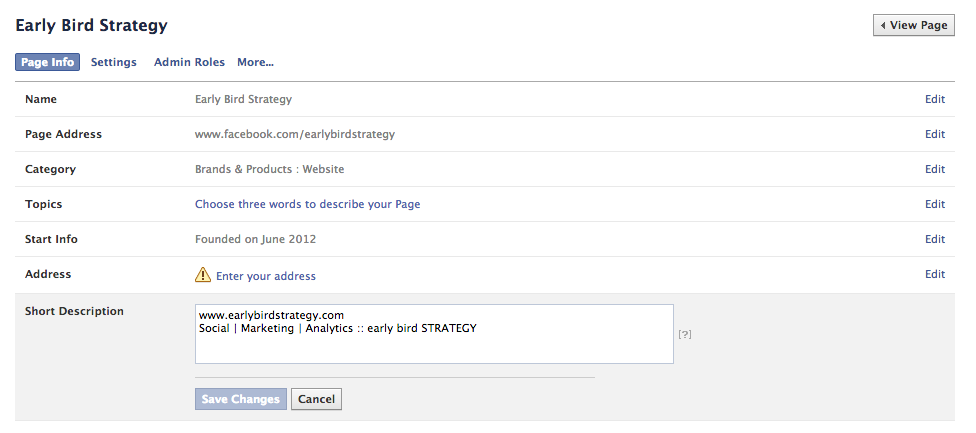
To begin, click on the 7th item down, the “Short Description”, this is the text that shows up just below your Profile Picture. On the first line, put in your website url, including www. but not http://. Example: www.earlybirdstrategy.com. After this you can include anything short and sweet that communicates who you are and what you do – elevator pitch!
Step 4: Add a profile picture (180px square)
To kick things off, we’ll use your logo as the Profile Picture. Remember to use a photo that people will associate with your business (your logo vs a random picture). The size of the image that displays will be a 160 pixel square, but you need to upload a minimum size of 180px. If you’re exporting or saving your image from software like Picasa or Photoshop, remember to make the quality the maximum it can be because Facebook will make it lower quality on its own.
Step 5: Add a cover photo (851px x 315px)
Your cover photo needs to be at least 851px x 315px. Don’t worry about the ratio too much as you’ll be able to adjust it slightly (moving up/down or side to side) after you upload it. Your cover photo can be just that (a photo), or you can design something with text (just don’t go too crazy with the text, you don’t want to repel people!).
Step 6: Back to the Page Info Settings
The next step is adding a bit more detail to our About page. We’ll navigate to our Page Info settings (like we did in Step 3 above), and start with Topics. Pick a few keywords that describe your business. For example a Nicaraguan coffee company could select “coffee” and “Nicaragua”. The next step in this section is adding your company beginning date. Thankfully, Facebook now lets you pick your own wording (founded, created, launched etc). In a later step, we’ll be able to add an image and more info to this date so people can see it on the Timeline. Next, add in long description. Think of this as the extended version of your elevator pitch that we used for the Short Description. If you’re feeling verbose, throw in some stuff in the other (optional) areas: mission, founded by, awards, products etc.
Step 7: Settings to change
Next, we’ll head back into the Settings area. Edit Page >> Edit Settings. Most of the default settings are appropriate, but just give it a once-over so you’re aware of options. For example, if you’re getting spammed by people posting and tagging your page, you can choose to not feature “Posts by Others” at the top right, under the third option of “Post Visibility”. If you don’t use Facebook much, you can also choose to be notified via your email address when people post, comment, or message you via your Page. And a more recent setting towards the bottom of the list is Replies, make sure that box is checked so that people can have threaded Reply comments on your Page. (For example, you have 20 people comment on something and you want to reply to just one vs your reply showing up randomly in the list). On the next tab over you can also add other Admins to your page with different control levels, like content creator etc.
Step 8: Spruce up your Timeline
Now that we have the basic settings out of the way, let’s spruce up your Timeline (previously called your Facebook Wall – meaning what you’re looking at when you go to your Page). If you just signed up, you’ll see a little post that says “Page Name just joined Facebook”, click the little arrow at the top right and select “Hide from Page”. Next, scroll down to the Founded/Created date at the very end an add an image. This is a fun way to add a little something extra for your users. (It will also put that date up in the top right of your page. So for example, if you joined Facebook in 2013, but were founded in 1956, it would list: those year in the top right of your Page. Pretty cool, huh? The last house-cleaning item is to add a bit of content before we let people know what we’re up to and asking them to “Like” us. So add 3-4 posts – pictures, blog posts, text only, video link etc. Think of it like hosting a party. You wouldn’t invite people to come to your party before you got a few basic things ready!
Step 9: Add some apps
Facebook Page Apps show up in the “tab icons” just below the cover photo. You can display the default options, like # of likes, Photos, and also add custom apps like Instagram, Mailchimp (if you use their email marketing software) etc. You can also move the boxes around by clicking the down arrow and then clicking the pencil “edit” icon at the top right corner of each individual box, which will give you the option to “swap positions with:”. To learn how to customize your Facebook tab icons, check out this tutorial.
Step 10: Promote!
Make sure your page is published (it will say in red letters at the top if it’s not), and remember to click Like on the Page yourself too! Next up, invite your friends to like the page (you’ll see this option at the top right area of your Page). Remember, don’t invite your entire friends list, only invite friends that you think would be interested. You don’t want people to start ignoring you from here on out, so be careful not to spam your friends. A more casual way of letting people know what you’re up to if you’re not sure if they’re really your target market, without invading their notification center is to post about your new Page on your personal profile. From top right click on Build Audience> Share, then write something like, “Want xyz? Like my new page to xyz. Please share with your friends if you are interested. Thanks for your help friends!”
Step 11: Follow a process!
Follow a process for posting to Facebook so you don’t waste time. Analyze! Add in relevant stats to your KPIs if it makes sense. If you’d like to learn more about Facebook Insights and optimizing your social accounts now that they’re set up, sign up for my newsletter. I’ll also be doing a followup post on creating a process around managing your social media account.
Want more tips on optimizing your social media presence? Like Early Bird Strategy on Facebook to keep up on the latest:
This is Part I in a series on using Facebook as a business. Now that you have the basics covered, check out Part II for more ways to ramp up your Facebook marketing.