 When was the last time you heard the word “webmaster”? It’s a little old school, but even Google still uses the term. Did you know there are a ton of free tools hidden inside Google Webmaster Tools that can help you grow your blog?
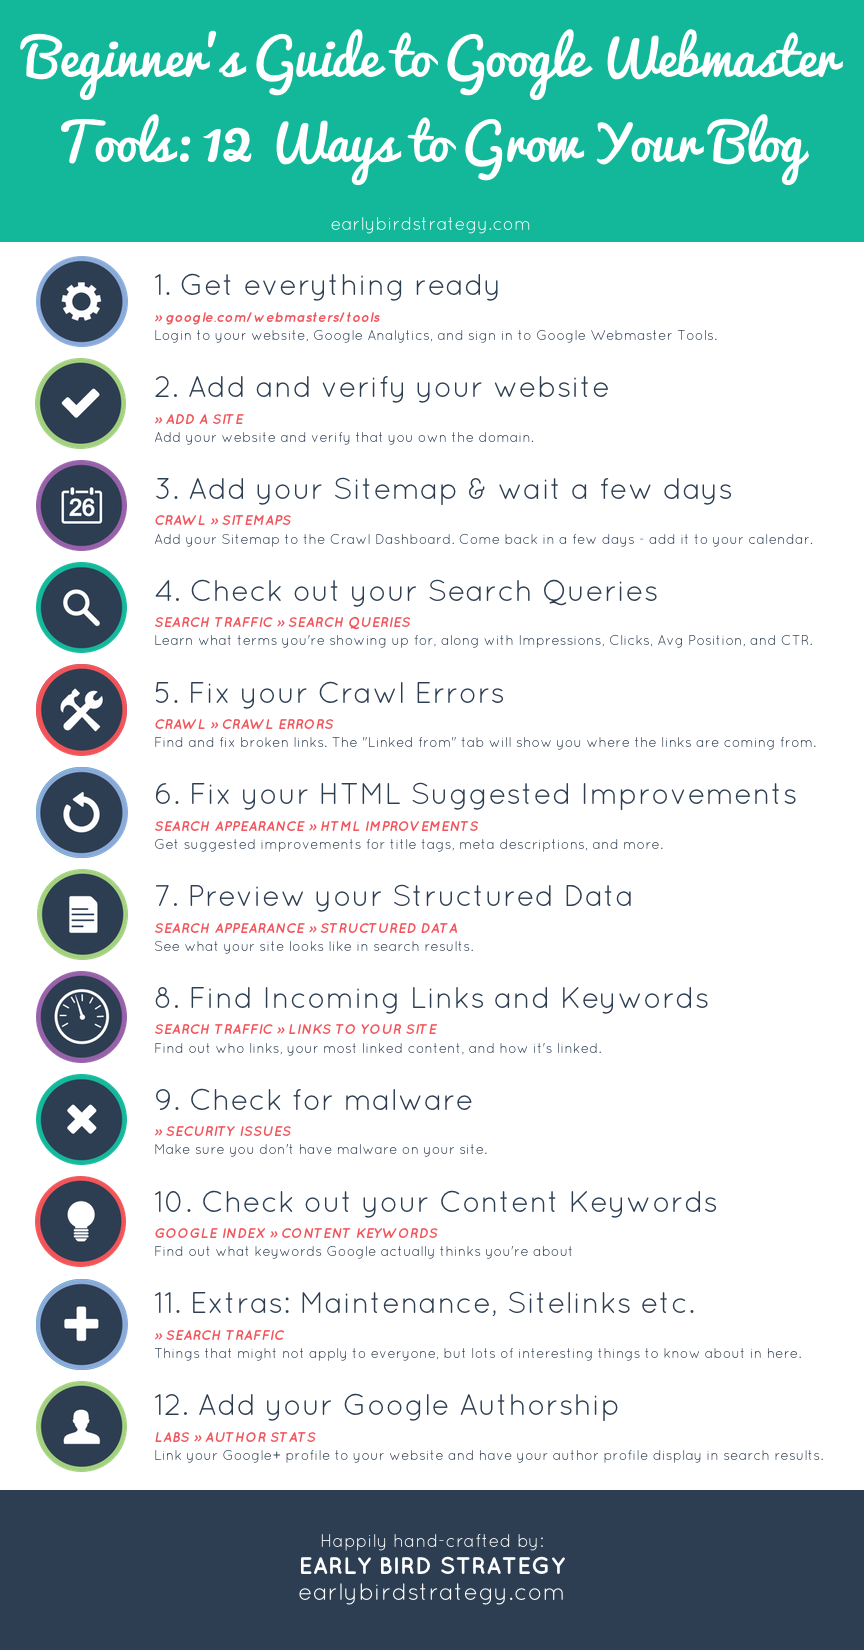
Table of Contents:
1. Get everything ready
2. Add and verify your website
3. Add your Sitemap & wait a few days
4. Check out your Search Queries
5. Fix your Crawl Errors
6. Fix your HTML Suggested Improvements
7. Preview your Structured Data
8. Find Incoming Links and Keywords
9. Check for malware
10. Check out your Content Keywords
11. Extras: Maintenance, Sitelinks etc
12. Add your Google Authorship
I get asked about SEO quite often – “How do I do SEO?”, “How can I improve my SEO”, “can’t I just ignore SEO?” etc. My short answer to these questions: #1. Focus on quality. Create quality content/art (whether that’s words, design, music, videos etc) and relationships. #2. If one of the biggest ways people find all that stuff you spent so much time creating is through Search, why would you ignore how to optimize it? Google Webmaster Tools is like the Google Gods saying “Hey guys, here are the rules we play by. Here’s what you’re doing wrong, here’s what you’re doing good, and here’s what you can optimize.”
Psst… if you don’t want to mess with the DIY option to SEO, check out my Website Audit and Action Plan service. Feeling like a DIY champ? Carry on!
Google Webmaster Tools can be overwhelming, so here’s where to start:
Step 1. Get things ready
For this tutorial, you’re going to need to get a few things ready:
- Pull up your website.
- Log in to your Google Analytics account (or sign up for one if you don’t already have it. On WordPress? There’s a quick and easy [free] WordPress plugin for that – #3 on this list.
- Sign in to Google Webmaster Tools (this just uses your Google Account).
Step 2. Add your website to Webmaster Tools
The first thing we need to do in Google Webmaster Tools is add your website.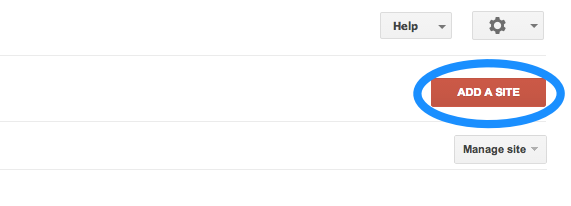
Click the red “Add a site” button, and put your url in the box that pops up. On the next screen, you’ll verify that you indeed own that domain name. You have the option of uploading an HTML verification file or clicking the “Alternate methods” tab. My preferred method is to sync with your Google Analytics account.
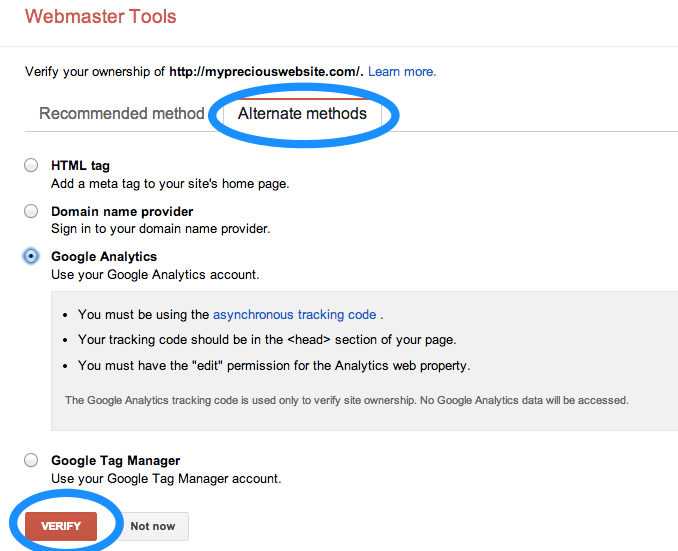
You also have the option of verifying with your domain name provider, through an HTML tag, or Google Tag Manager. There’s also a new WordPress plugin from Google called Google Publisher Plugin. That might make it easier for you to validate and get up and running with Webmaster Tools (and AdSense too).
Step 3. Add your sitemap and then wait a few hours or days
It can take a few hours or days for Google Webmaster Tools to start displaying useful information. So make sure that you’ve pointed them toward your content by adding a Sitemap. Click on Crawl>Sitemaps and then the red “Add/test sitemap” button. If you use the Yoast SEO plugin (#2 on this list), you’ll find your XML Sitemap at YOURSITE.COM/sitemap_index.xml.
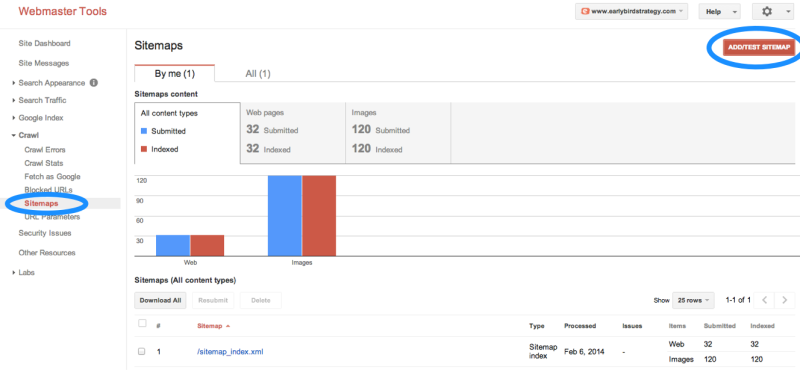
A Sitemap is your way of saying “Hey Google, I may have 3,000 things on my blog, but these 200 posts are most important, ignore everything over there, and always treat stuff from this category as the most important!”
Once you’re done with that set a calendar appointment to come back and continue this tutorial next week! Done with that? Welcome back!
Step 4. Check out your Search Queries
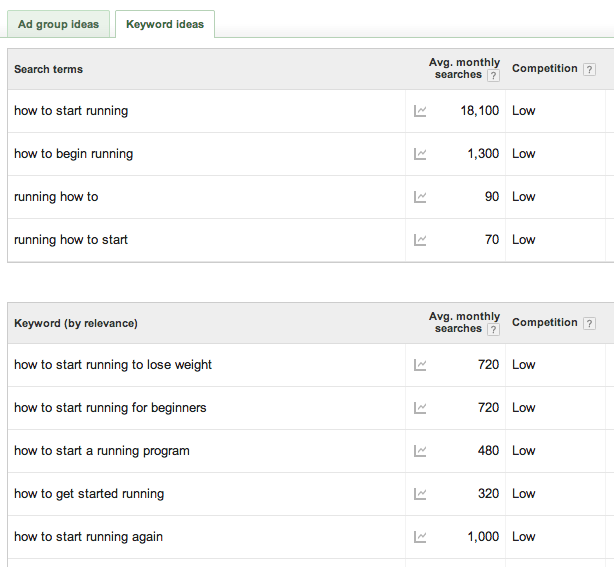
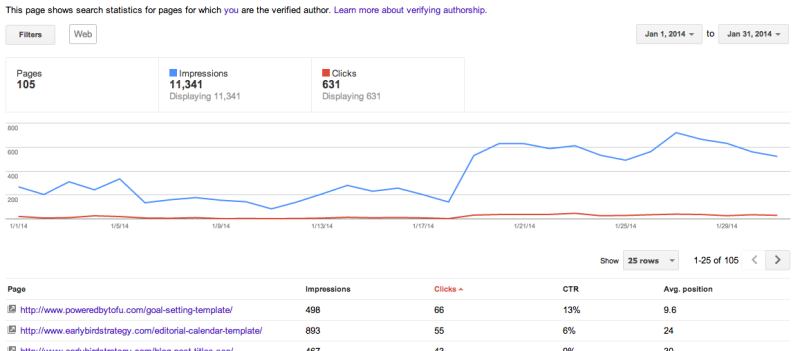
If you spend a bit of time in Google Analytics, then you already know that Google took away the ability to see most of the keywords that brought visitors in. Now most say “not provided”. Not cool Google. The good news is that you can still see some of this data from within Webmaster Tools. You can even link this data into your Google Analytics account. (In Analytics, you’ll find this under the Acquisitions>>Search Engine Optimization>Queries tab). This is what it looks like:
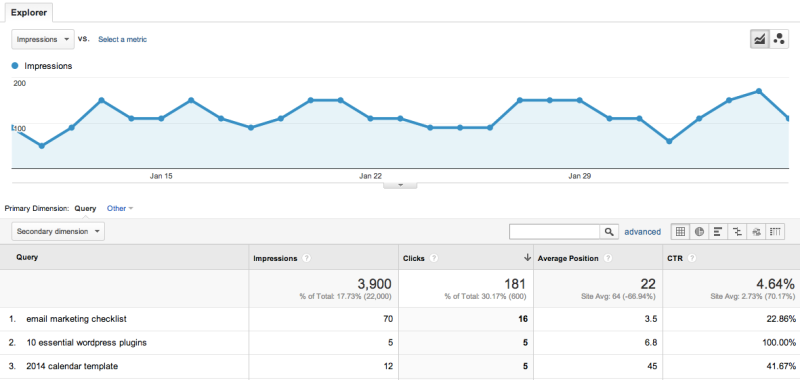
Another cool benefit of this is seeing:
- the query (what people searched for)
- the impressions (roughly how many people saw it)
- the clicks (how many people clicked your site)
- the ranking (how far up the page you were when they clicked)
- the click-through rate (often called CTR – of all the people who saw it, what % clicked)
Why does all this matter? The higher your click-through rate the higher perceived relevance you have on that topic. What a great way to know what people are finding useful on your site. What else you could write about in that veign. Low click-through rate? From the title, image, and meta desc, people aren’t finding your little snippet too compelling. What can you change?
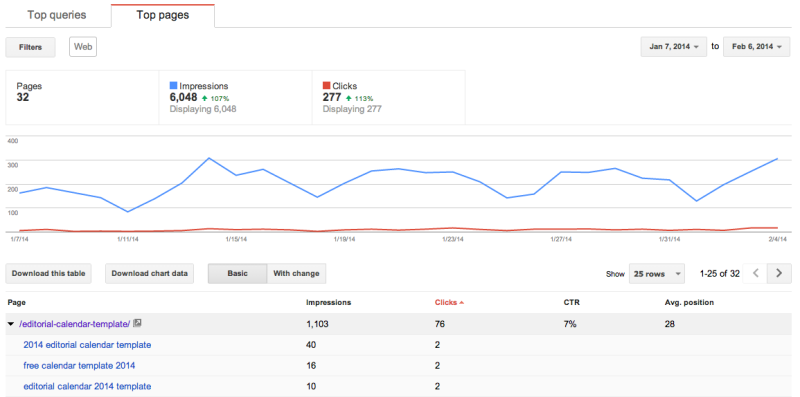
What you’re seeing in the above picture is the Top Pages view in the Search Queries dashboard. You can look at top queries or the top pages and then narrow down the queries attached to each “top page”. There’s a ton of data in here. What can be especially useful is tracking those posts that you spent a lot of time creating, and which you hope will be useful for some time. For example, last week’s post on creating an editorial calendar, is already seeing some visibility on Google. In a month or so, I can look and see how it has improved. The “with changes” button is also a quick way to visually see the increases/decreases in impressions, clicks, click-through rate, and position over time. Remember that you can also change the date range at the top right.
This differs from keyword data found in Google Analytics. Analytics keyword data shows you how people made it all the way to your site. In Google Webmaster Tools you’re seeing the bigger picture – the missed opportunities. You can know the number of people who saw and then either clicked – or didn’t click – through to your site.
Have a great click through rate on a query but lower average position? This might be some great content. You could link up this content around your blog, re-promote it on social media or see if there’s another way you can get more people to it (through linking or guest blogging etc.).
See if you can come up with a few theories or ideas to test from all the data in this dashboard.
Step 5. Fix your Crawl Errors
Homework time! It can feel pretty monotonous to clean up broken links around your site (especially if you’ve had your website for years). When you first arrive at the Crawl Errors dashboard, you might find a big list of errors.
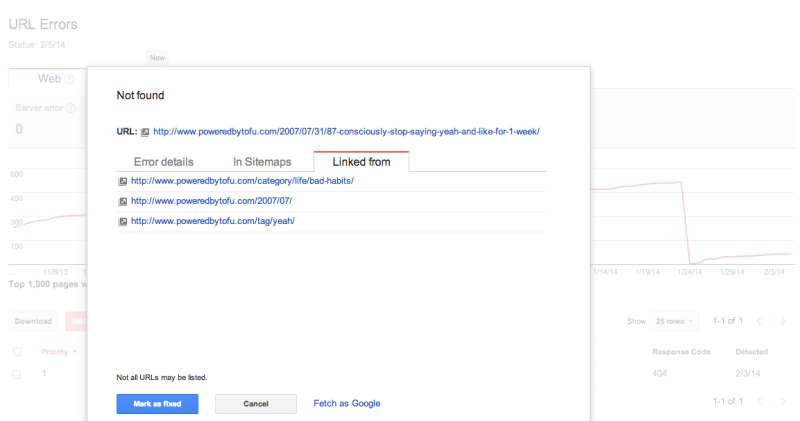
By clicking on each row, you’ll see a popup with more info like the one pictured above. If you click on the “Linked from” tab, this is the area where you can see where the broken link traffic is coming from. Is the broken link coming from your site? Good news, you can fix it! Not on your site? Request that they fix it, add a 301 redirect if it’s important, or just let it go. You don’t have to fix everything one by one either. With one of my clients, we were able to make one structural change that fixed thousands of errors on their site in one go. Now that’s an efficient use of time, and increasing traffic that was just landing on a broken page before.
It helps to think of it from your reader’s perspective though. It can be so frustrating to come across a broken link. If you have a ton of these to clean up, set a recurring calendar appointment to work through these or set a timer for 20 minutes to get started.
Step 6. Fix your HTML Suggested Improvements
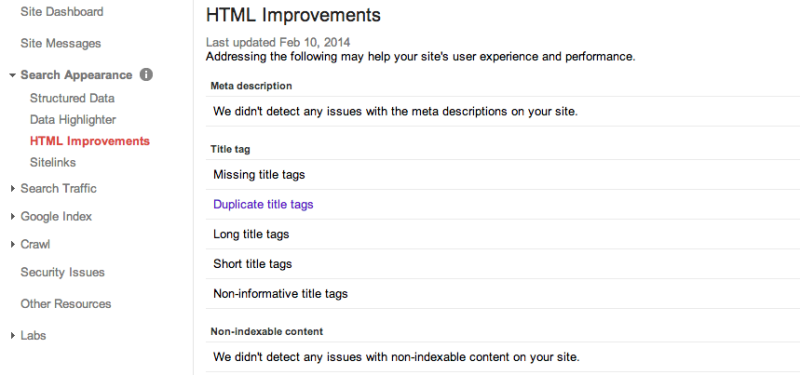
Another great feature of the Search Appearance area is the HTML Improvements section. This is where you can find out HTML improvements that can help your site’s performance on Google and user experience. You’ll find tips on meta description issues and pages that have title tag issues – either missing, duplicate, too long etc.
If you have a lot of suggested improvements in this area, I would recommend adding them to your to-do list of choice. Work on them incrementally over the next few weeks.
Step 7. Preview your Structured Data
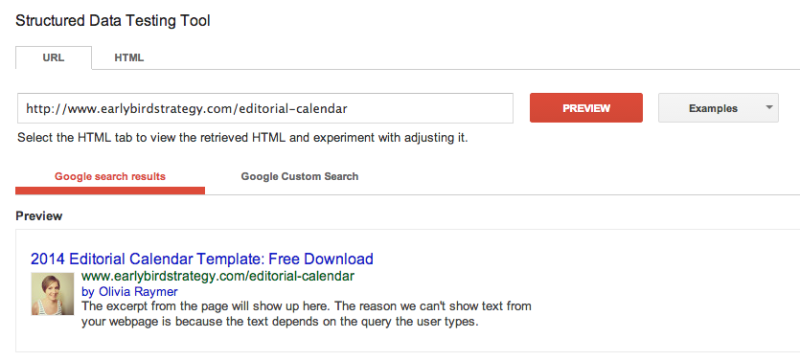
Another neat feature in the Webmaster Tools area is the Structured Data Testing Tool. You can paste in a link and see what Google “sees”, including if they’re seeing your Authorship data. You can also see some of this in the Crawl>>Fetch as Googlebot area.
Step 8. Find Incoming Links and Keywords
You can find inbound links that bring you traffic within Google Analytics, but you can find out more information about incoming links with Webmaster Tools. You can see who is linking to you and in what context – how many links, how many domains, and what pages. You can also find the most common keywords Google found when crawling your site and what anchor text people are using to link to you. You’ll find these reports under Search Traffic>>Links to Your Site.
The Incoming Links dashboard has three main areas. You’ll see a list of who links the most (the # of pages), a list of your most linked content, and how your data is linked up.
Step 9. Check for malware
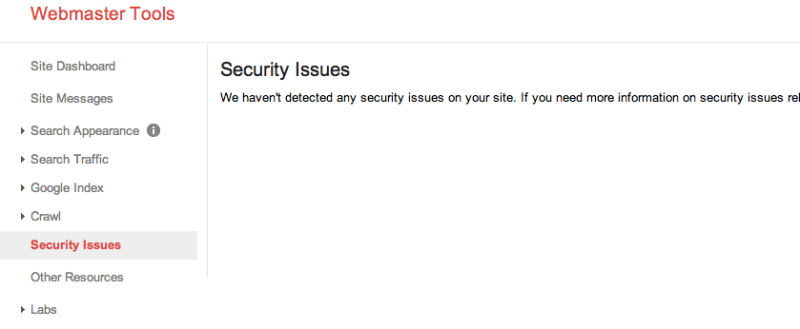
Sometimes your website can get hacked by spammy malware and not even know it. Google tries to help with this by having a Security Issues area in Webmaster Tools.
Step 10. Check out your Content Keywords
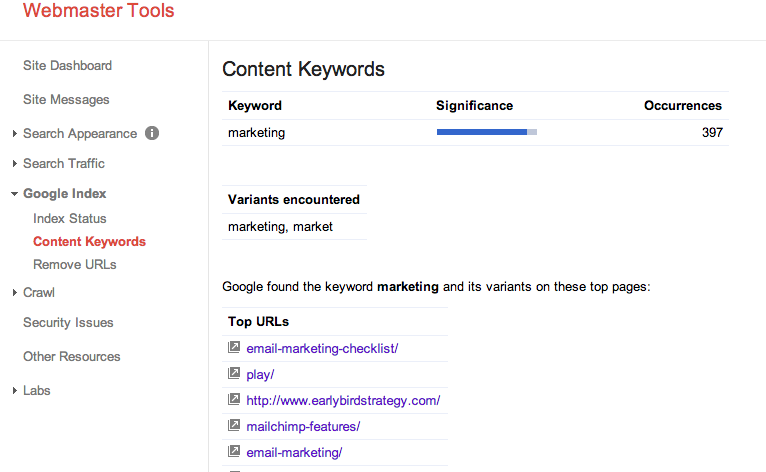
Do you know what keywords you’re targeting? Do you they match up well with what Google considers your top keywords to actually be? You can check out your Content Keywords in the Google Index>>Content Keywords area. You’ll see the keywords, variants, and significance.
Step 11. Extras: Maintenance, Index Status, Sitelinks etc.
You could spend days sifting through Webmaster Tools. In this step I’ve lumped together a bunch of interesting things that might not apply to everyone, but are still good to know about:
- Index Status – How many pages has Google Indexed on your site
- Sitelinks – You can request that Google remove a link if you don’t want it coming up in search under your other search results.
- Blocked URLs – You can edit your robots.txt file
- Internal Links – Want to know where you’re linking internally the most? Check out Internal Links.
- Page Speed – Google’s PageSpeed Insights deserves an entire post of it’s own.
- Change of Address – Did you change domains names? You can tell Google this using the “Change of Address” tools under the gear icon.
Step 12. Add your Google Authorship
UPDATE AUG 28, 2014: Google stopped showing Authorship in search results. However, Author Rank and markup is still alive and well on the Internet, so don’t go deleting everything. Search Engine Land had a great post about this.
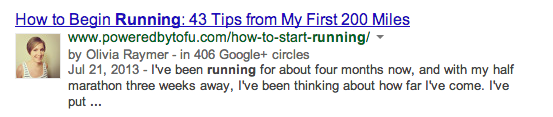
Google Authorship is one of the most overlooked areas of the new Google Webmaster tools. Don’t pass up the opportunity to link your Google+ profile to your content. You’ll also start seeing a higher click through rate on content that is linked up. People tend to click on results that show an author profile image. This can also help grow your Google+ circles. There are two main ways to link and verify with Google Authorship. Here’s Google’s help article on how to do it.
And you’ll find your Author stats in the Labs>>Author stats section of Webmaster Tools.
Conclusion
And there you have it – 12 ways to get started with Google Webmaster Tools. You might not feel like search is your biggest inbound channel – instead favoring email marketing or social media etc. But, with a few small alterations you can set your site up to perform better without having to constantly focus on SEO. Following Google’s recommendations for your site, is one of the best processes to start early on. A process that can bring you more traffic, community, and customers.
Have you used Google Webmaster Tools? Questions? Tips? Leave them in the comments!